\HAPPY WINTER SNOWMAN/
For Christmas♪
Want to make some snowman table decorations?
Cute handmade snowman.
Create a room with a cozy Scandinavian atmosphere.
You can download the pattern here . (Please note that it is in English.)
→ Download the pattern
<Materials>
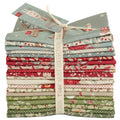
- material:
-
Other ingredients:
- Applique Sheet
- Applique adhesive pens (for paper piecing)
- A stick with a slightly pointed end (such as a flower stick, for the nose)
- A thin, leafless branch for your arm
- Hot glue gun
- Cotton (approximately 75g to 150g per snowman)
<Optional Tools>
- sewing machine
- Thread and needles for hand sewing
- Floral sticks or chopsticks (for tipping and stuffing)
- Cardboard (to copy the pattern)
- Black hobby paint and small metal pins for the eyes
- Lipstick, etc. (for cheeks)
<Fabric size>
- Small: Approx. 20.5cm high x 36cm wide
- Medium: Approx. height 23cm x width 36cm
- Large: Approx. 25.5cm high x 36cm wide
- Heart: Approx. 8cm high x 9cm wide
- Applique sheet: approx. 6.5cm x 8cm
- Scarf: Approximately 1.5cm x 20cm scrap of fabric
<How to make a snowman>
1. Before you start your project
Please refer to the following points:
Copy all the pattern pieces onto cardstock and cut out the shapes.
Please read all project notes before beginning.
The fabric used is shown in A.
All snowmen are sewn in the same way, only the height of the body differs.
- Use thick paper to copy the pattern.
- The outside lines of the pattern are the sewing lines (usually not including seam allowances).
- Set the stitch length to 1.5mm to 1.6mm.
- Unless otherwise instructed, sew along the outside line of the pattern, then cut out your shape 1/2-2 inches (3mm-6mm) outside the sewn line.
- To create a nice shape, make cuts inside the seam allowance of the rounded parts.
- When stuffing small areas with cotton, use a stick to pack it in tightly.
-
Sew the gap closed with the matching thread and finish with a small blind stitch.
2. Creating the body
- Fold the body part of the fabric in half, right sides together. Place and mark the body pattern. Then sew around the body, leaving the corners open and an opening at the bottom to turn it inside out (Fig B).
- Cut out the entire circumference leaving a seam allowance. To add depth to the body, fold the open corners over so that the seams overlap, then sew the corners together horizontally (Fig C).
- Make a cut where the seam bends inwards (Fig D).
- Flip it right side out, stuff it tightly, then hand sew the opening closed.
3. Creating a heart
- Cut out a heart shape from the appliqué sheet (no seam allowance needed). Iron it, adhesive side down, onto the wrong side of your fabric (Fig E).
- Cut out the fabric with a seam allowance. Make several cuts in the seam allowance, especially along the curved areas.
- Use a fusible pen to apply glue to the edge of the seam allowance. Use your fingers and a wooden stick to press the seam allowance into the edge (Fig F).
- Position the heart onto the finished body and sew it in place (Fig G).
4.
To make the scarf, pull and cut a strip of fabric about 1.5cm wide.
The scarf is about 8 inches long, but you may find it easier to tear a longer scrap and tie it around your snowman, then trim the ends to the right length. To keep the ends in place, you can glue them to the snowman with a hot glue gun.
5.
To make the face, we recommend using black hobby paint for the eyes and a little redness on the cheeks using lipstick and a dry brush. Mark the location of the eyes with a pin first, then use a dry brush and a little lipstick to blush the cheeks. Dip the head of a small metal pin, about 3mm-4mm in diameter, into the paint and press and stamp the eyes onto the snowman. Make the nose by cutting off the tip of a floral stick. You can also dye the nose color with brown or gray paint to match the branches on the arms. Use a hot glue gun to glue the nose to the snowman. Repeat this process to make other snowmen for your table decorations.
6. Finished!
Check out the photo for snowman placement.
I placed a big snowman in the back and a small snowman in the front.
Use a glue gun to glue the snowman together.
Cut out small branches for the arms and glue them to the snowman with a glue gun.
Snowman pattern
Add seam allowances to all the pieces of the pattern, but do not add any seam allowances to the applique sheet for the heart.
The edge of the pattern indicates the seam.
The dotted lines indicate the openings. Sew all the solid lines on the pattern.


